Are you ready to elevate your pasta game? If you’ve ever dreamed of making fresh, homemade tortellini from the comfort of your kitchen, then it’s time to meet the tortellinatrice. This delightful machine is not just a tool—it’s your passport to authentic Italian cuisine. With its charming design and user-friendly features, it transforms ordinary dough into exquisite little pockets filled with flavor.
In this guide, we will walk you through everything you need to know about using a tortellinatrice. From selecting the best ingredients to mastering those perfect folds, you’ll soon be crafting delicious tortellini that impresses family and friends alike. So roll up your sleeves and get ready for a culinary adventure!
What is a Tortellinatrice?
A tortellinatrice is an innovative kitchen device designed specifically for creating tortellini. Think of it as a pasta maker with a twist, ideal for those who appreciate the art of Italian cooking.
Crafted to streamline the process, this machine allows you to shape and fill your dough effortlessly. Its unique design ensures consistent sizes and shapes every time, making it easier than ever to achieve that perfect bite.
Whether you’re a novice or an experienced cook, using a tortellinatrice adds an element of fun to your culinary routine. It combines tradition with convenience, helping you recreate authentic recipes in no time.
With its compact size and user-friendly features, it’s a must-have for any pasta enthusiast looking to explore their creativity in the kitchen. Embrace the joy of handmade tortellini without all the hassle!
The History and Importance of the Tortellinatrice
The tortellinatrice, a beloved kitchen tool, traces its roots to the Emilia-Romagna region of Italy. This area has long been celebrated for its rich culinary traditions. The art of making tortellini dates back centuries, reflecting local flavors and craftsmanship.
Historically, families passed down recipes from generation to generation. Each household added personal touches to their fillings and dough recipes. The tortellinatrice became essential in these kitchens as it streamlined an intricate process.
Crafted with precision, this machine allows home cooks and chefs alike to create uniform pasta shapes effortlessly. Its importance lies not just in efficiency but also in preserving cultural heritage through food. In today’s fast-paced world, using a tortellinatrice connects people with tradition while enjoying fresh-tasting homemade pasta at the dining table.
Step 1: Choosing the Right Ingredients
Choosing the right ingredients is crucial for making delicious tortellini. Start with high-quality flour, preferably “00” grade, which offers a fine texture perfect for pasta. This type of flour creates an elastic dough that holds its shape during cooking.
Next, consider your eggs. Fresh eggs add richness and color to the dough. Opt for large organic eggs if possible; they enhance flavor and provide better nutrition.
When it comes to filling, think about balance and freshness. Traditional options include ricotta cheese mixed with spinach or meat like pork or veal seasoned well with herbs.
Don’t forget seasoning! A pinch of salt in both the dough and filling elevates flavors significantly. Choose fresh herbs like basil or parsley to infuse vibrant notes into your tortellini.
Remember, using seasonal ingredients not only supports local farmers but also enhances taste immensely!
Step 2: Preparing the Pasta Dough
Preparing the pasta dough is a crucial step in making tortellini. Start with high-quality flour, ideally “00” flour, which gives you that silky texture.
Create a mound of flour on your work surface. Make a well in the center and crack fresh eggs into it. The ratio is typically one egg for every 100 grams of flour; adjust based on how many tortellini you plan to make.
Using a fork, beat the eggs gently while gradually incorporating the flour from the edges of the well. As it starts to come together, switch to using your hands.
Knead the dough for about 10 minutes until it’s smooth and elastic. If it feels too sticky, sprinkle some extra flour as needed.
Wrap your dough in plastic wrap and let it rest for at least 30 minutes at room temperature. This allows gluten to relax, making rolling much easier later on.
Step 3: Filling the Tortellini
Now comes the fun part: filling the tortellini. This step gives you room to get creative with flavors and textures.
Begin by choosing your favorite filling—be it ricotta, spinach, or a savory meat mixture. A classic option is a combination of prosciutto and cheese for that authentic taste.
Scoop small amounts of filling onto each pasta square or circle you’ve cut from your dough. Remember, less is more here; overfilling can lead to bursting during cooking.
Once filled, fold the pasta carefully, ensuring there are no air pockets trapped inside. Pinch the edges firmly together to create a nice seal.
For an added touch, shape them into traditional tortellini by wrapping them around your finger and sealing the ends together. This not only enhances their appearance but also ensures they hold their shape while boiling.
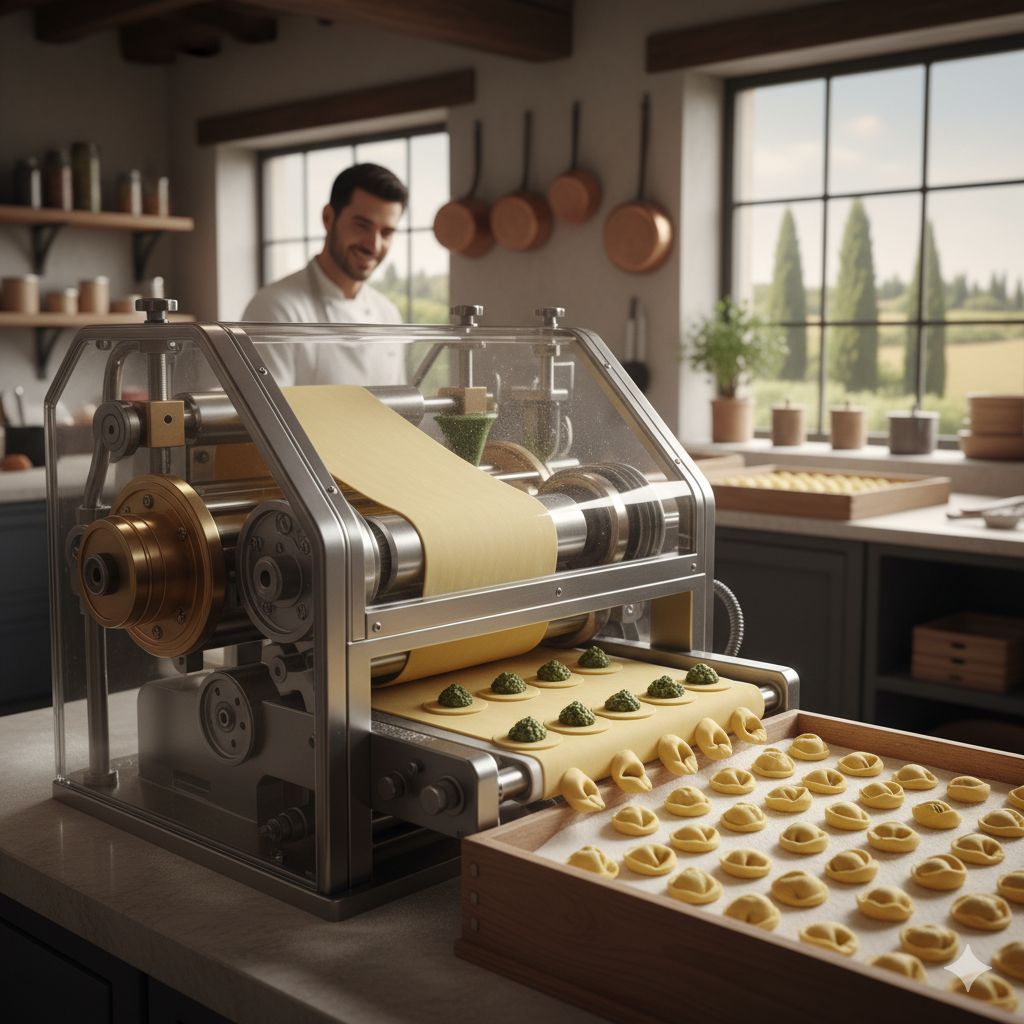
Step 4: Using the Tortellinatrice
Once your dough is ready and filled, it’s time to bring the Tortellinatrice into action. Position the machine on a stable surface for ease of use.
Start by feeding a small portion of the prepared pasta through the rollers. Adjusting the thickness settings can help achieve your desired texture. The beauty of using this tool lies in its ability to create uniform sheets every time.
Next, place your filling onto one half of the sheet as you roll it out. Carefully fold over the other half so that each piece is well-sealed, avoiding any air pockets—these can cause unwanted bursts during cooking.
Crank away! Watch as perfectly shaped tortellini emerge from the machine’s outlet. A quick dusting with flour will prevent them from sticking together while you work on more batches. Enjoy this simple yet rewarding process as you craft homemade delights!
Tips for Perfect Tortellini
For perfect tortellini, start with fresh ingredients. Quality flour and eggs make all the difference in your pasta dough.
When rolling out the dough, aim for a thin consistency but not so thin that it tears easily. A well-rolled sheet allows for better filling.
Don’t overfill your tortellini! Too much filling can cause them to burst during cooking. A teaspoon is usually enough.
Make sure to seal the edges properly by pressing firmly to avoid any leaks while boiling.
Cook your tortellini in salted water and only until they float. This ensures they’re tender yet firm—al dente at its best!
And if you want extra flavor, toss cooked tortellini with olive oil or butter right after draining them; this prevents sticking and enhances taste beautifully.
Alternative Uses for a Tortellinatrice
Beyond making traditional tortellini, a Tortellinatrice can be an exciting kitchen tool with various alternative uses.
Consider using it to craft other pasta shapes like ravioli or agnolotti. With slight adjustments in filling and dough thickness, you can expand your culinary repertoire effortlessly.
You could also use the machine for folding dumplings or empanadas. The precise folds ensure even cooking and perfect closures, adding flair to your dinner table.
If you’re feeling adventurous, try utilizing the Tortellinatrice for sweet treats too! Create filled pastries with chocolate or fruit mixtures for dessert that will impress any guest.
Consider repurposing it as a mold for savory bites like mini quiches or appetizers; just adjust ingredients accordingly to fit within those delightful pockets of dough.
Conclusion
The Tortellinatrice is not just a kitchen tool; it’s a gateway to authentic Italian cooking. Mastering the use of this device opens up endless culinary possibilities, allowing you to create delicious tortellini that pay homage to traditional recipes while adding your own flair. By following these steps—choosing fresh ingredients, preparing the dough with care, and filling each piece thoughtfully—you’ll unlock the secrets of perfect pasta.
With practice and patience, those initial attempts will transform into beautiful little parcels of flavor. Experiment with different fillings or even explore alternative uses for your Tortellinatrice. The joy it brings in creating homemade meals can be both satisfying and rewarding.
So roll up your sleeves and dive into the delightful world of tortellini-making! Your taste buds will thank you as you savor each bite made from your very own hands.